• Blog
  • Events
    • Categories
    • Locations
    • My Bookings
    • Tags
  • Site Search


Close Menu

Home | About | Careers | Investors | Media | Contact

SYNNEX e-Storefront Help

SYNNE e-Storefront Help

How to Create Your Own Homepage Categories

May 20, 2014 by tammys

There is a way to create a category on the homepage and have it point to a specific sub-category. For example, you could have a 3D Printer category separate from a Printers/Supplies category.
You need to find a sku that exists in that category. That sku’s image will be the homepage image, so make sure you select a sku that HAS an image.
Now log into the eStorefront administration pages and navigate to My Storefront > Catalog Categories (Search)
On that page, click the ‘Add Line’ button at the bottom-left to create a new homepage category.
On that new line:
  1. under the Leading Sku column, enter the sku number
  2. under the Group Name column, enter the category name you want (e.g. 3D Printers/Supplies)
  3. in the SKU Categories (Display) column, make sure the radio button is on the indented sub-category name. That way, the end-customer will be taken directly to that subcategory
  4. Back in the Seq column on the far left, enter the number where you want this category to display.
    Categories display from top left (Seq 2- there is no Seq 1 so don’t use a 1) across to top left (Seq 6) and to the next row far left (Seq 7) to far right (Seq 12) and so on.
    You will need to change the Seq numbers of the other categories.
Click the ‘Update Changes‘ button at the bottom to save your work.
Once you’re sure the category structure is the way you want it, click the ‘Publish‘ button at the bottom of the page.
You should now be able to see the revised category structure on your site (if you don’t make sure you delete your browser’s cache and try again, or try using a browser that has not visited your eStorefront recently).

Filed Under: Product Categories Tagged With: Pages

How to approve an end-customer order

May 16, 2014 by tammys

If you have an eStorefront where end-customers are:

  • submitting Purchase Orders (POs), or
  • paying via PayPal and you’re approving each order…
…below are the steps to view and approve those orders:
Log into your eStorefront using the Administrative login URL: USA reseller login /
Canada reseller login
On the landing page, you will see a section called “Orders Pending for your Approval“.
If the number is zero, there are no orders to approve.
If the number is greater than zero, click the number.
You’ll be taken to the Recent Orders/Quotes page (which is also available from the blue navigation menu, under Orders/Quotes > Recent Orders/Quotes
There you will see links in the PO # and Confirmation # (CFM #) fields.
Click either of those numbers and you’ll see the order in our checkout page.
It will be populated with the information from the end-customer’s order.
Review the information carefully.
Once you’re ready to approve the order, click the Submit button at the bottom of the page.
You have approved the order.
We will do the pick/pack/ship to the end-customer and invoice you for the order.

Filed Under: Orders Tagged With: Orders

Allowing End-Customers to Enter a Purchase Order (PO) Number

May 6, 2014 by tammys

You can set your eStorefront to have customers enter a Purchase Order (PO) number in the Shopping Cart.

If you need them to upload a PO document also, that can be done too.
Here’s how to turn these PO options on:
  1. Log into the admin section of your eStorefront
  2. In the blue menu, go to My Storefront > Storefront Profile
  3. In the General Options section (about 3/4 down the page) you will see checkboxes that allow you turn on/off:
      • Display PO# field in Shopping Cart (with a pulldown menu to make it optional or required)
      • Enable PO Upload (Required)
Once you’ve set what you want, scroll to the bottom of the page and click Save and Publish, and you’re done!

Filed Under: Shopping Tagged With: Settings

How to create an end-customer login

September 9, 2013 by tammys

In the Enduser Listing, page, there’s an option to create a new end-customer location AND a new end-customer contact at any location.

But these options don’t create a login for that person…they just create a contact entry.

So how do you create an new end-customer login (thereby creating an account and a contact entry)?
Here’s how:
Login to your eStorefront Admin page.
  1. Go to My Storefront > Enduser Listing:
  2. Click ‘Login As‘ beside the enduser location you want to add a login to
  3. On the new layout that displays, go to Account > User Administration
    (note the name of the page you land on: Create User Login)
  4. Click the ‘Add‘ button
  5. If the person’s name is in the first radio button pulldown list, select them in that list.
    If their name isn’t listed, click the second radio button (Add new Contact)
  6. From either radio button option, enter the required info, a User ID, and the permissions you want the enduser to have
    For the User ID, use something like their first and last names.
  7. Under User Rights, click the Select All box.
  8. Now click the ‘Submit‘ button
  9. Log out as this end-customer by clicking the ‘Back to Login as Reseller Store Admin)‘ link near the top of the page.
Our system will send an email to the end-customer stating they now have an account. There’s a link in that email for the user to enter a password.
Also, make sure to tell them their login works only at your estorefrontmall.com login page.

Filed Under: Customers Tagged With: Customers

How to Enter Your Own End-Customer Reference Numbers

August 26, 2013 by tammys

As of today, you can assign your end-customer reference numbers into your eStorefront.
So if you want to take your system’s customer number and save that into our system, you can!
  • Login to your store,
  • Go to My Storefront > Enduser Accounts,
  • Pick the end-customer by clicking ‘Edit’,
  • Enter your reference number in the Your Ref # field provided
    (the number can be a mix of letters and numbers).and
  • click the ‘Update’ button.
The number you entered displays in the Enduser Accounts page.
You can sort the page by that number also.
If your store is set up for you to approve each order you’ll see your customer reference numbers in the order checkout page.
Enjoy!

Filed Under: Customers Tagged With: Customers

How to fix a missing homepage image

July 18, 2013 by tammys

Product images in your homepage categories are picked from active skus when your eStorefront was created.

Occasionally a sku will become discontinued. When that happens, you’ll see a No Image graphic in that category on your homepage.
Here’s how to replace that missing sku’s image with another.
Click the No Image graphic on your eStorefront’s homepage.
You will see the search results page. Find a sku that has an image you want to use.
Example: For Computers, you probably want to have an image from a notebook.
If needed, click on the Filter by Product Family/Category options (left-side column) to navigate to the sub-category you want (e.g. Notebook/Tablet PC).
Now that you’re in this category, pick a product that:
  • has an image
  • has lots in stock (usually meaning they’ll be around for awhile)
  • doesn’t have EOL (End Of Life) underneath the long description
  • is not part a kit sku.
Copy the manufacturer part number for the sku you want.
Log into ECExpress and search for that part number to get the our matching SKU number.
(If you already know the SKU, great!)
Now, log into your eStorefront admin URL.
From the navigation menu, go to My Storefront > Catalog Categories (Search)
Scroll down the page until you see the category name you want to change the image for. You’ll know you found it when you see there is nothing in the SKU Categories (Display) column for that sku.
Replace the old sku with the new sku and click anywhere outside of that text-entry box.
Now you’ll see 2 radio button options appear in the SKU Categories (Display) section. Make sure you click the first radio button. (If the second button is selected, users will go directly to chat sub-category; there will be no option to navigate to other sub-categories, like Desktops).
Scroll to the bottom of the page and click the ‘Update Changes’ button.
Now click the ‘Publish’ button.
Your eStorefront will now display the image of the sku you entered.
You may need to clear your browser’s cache to see the change.

Filed Under: Product Categories Tagged With: Pages

How to assign HP Big Deal numbers to end-customers

July 16, 2013 by tammys

Login via your eStorefront Admin url.

From the navigation menu, go to My Storefront > Enduser Accounts

Select the Enduser account by clicking ‘Edit‘.

On the page you’re looking at, you will see a HP Bid Dealfield

Enter the Big Deal number(s). Separate each with a comma.

Now click the ‘Update‘ button at the bottom of the page.

Contact your account rep to make sure those end-customer Big Deal numbers are assigned to your eStorefront account.

You’re done!

Filed Under: Customers Tagged With: Customers

Add your own links to the Contact Us page…

June 26, 2013 by tammys

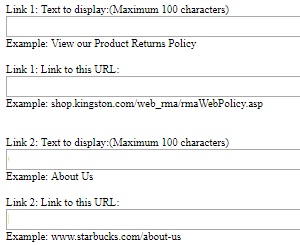
We just deployed a featured on your Storefront Profile page that allows you to enter up to 2 URLs that will appear in your Contact Us pop-up.

You can name the links to whatever you want.

Here’s a screenshot…just check the “Optional” box, enter a link description, a URL, click the Save and Publish button at the bottom of the page, and you’re done!
Filed Under: z-Other Tagged With: Pages

‘Add to Favorites’ now available

June 24, 2013 by tammys

Now your customers can add items to their own Favorites list.

We use a traditional star icon for this.

Your customer will find it on the search results page as well as any product’s specification page.

Of course your customers need an account login in order to add that item to their Favorites list.

Once they DO log in, they will see a new Favorites page. They can add any favorites to their Shopping Cart, or delete them.

Be sure to tell your customers about this!

Filed Under: Shopping Tagged With: Customers

How to Create an End-Customer Account

May 16, 2013 by tammys

At times you may need to create an end-customer account.

Here’s how to create that account:

Login via your eStorefront Admin url.

From the navigation menu, go to My Storefront > Enduser Accounts

Click the ‘Create a new end user’ link.

  • Enter the information in these fields:
  • Company Name (If not a company, enter the person’s first/last
    name)
  • Location Name (this is auto-populated by the Company
    name, but you can change it if you wish)
  • Street Address
  • City
  • State/Province
  • Zip/Postal Code
  • Contact Name
  • Phone
  • Email

Finally, click the Submit button.

You’ll be taken back to the Enduser Account page.

Underneath the End User Name there’s an End User number.

(Note there isn’t any Billing Info because they haven’t submitted an order with a billing address yet.)

Now let your customer know they have an account: ask them to click the Forgot your password link so they
can create their own password.

You’re done!

Filed Under: Customers Tagged With: Customers

  • « Previous Page
  • 1
  • 2
  • 3
  • 4
  • Next Page »

Categories

  • Customers
  • Orders
  • PayPal
  • Pricing
  • Product Categories
  • Settings
  • Shipping
  • Shopping
  • z-Other

Copyright Policy | Terms & Conditions | Accessibility| Privacy Policy | Legal Information